A Beginner’s Guide to Values in Oil Painting
- Jan 14
- 5 min read
Updated: Jan 15
If you want your painting to look 3 dimensional and create an illusion of form, understanding values is the key.
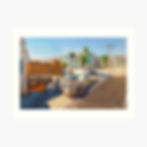
In this post, I will explain the value scales, simplify the below reference into its values and show step by step process to paint this 3d cube.

But before we squeeze out any paint, lets quickly go though some value scales with artists use.
In a real world, there are infinite values between black and white, but artists group them together into steps which are easier to work with.

Some of the popular value scales being
Notan

This scale is used in the initial thumbnail stages to determine if a painting would work as a whole or not. It is more about shape and composition rather than form.
The 5 - value scale

It has more values to work with in addition to Black & White, there is a Mid-tone, and a light and dark, between the mid and extremes. This is excellent for beginners, as its simple and easily to remember. There is less confusion when simplifying and grouping values when you looking at the reference.
.
The 9 - value scale (Denman Ross)

This is one of most common scale It has the same white, light, mid, dark and black from the 5 value scale and in addition it has the in betweens high light, low light, high dark and low dark. This particular scale was introduced and labeled by an American painter called, Denman Ross. Some artists also label it as numbers, with 1 as black to 9 as white. Each step increases incrementally in tonal value and is noticeably different to the eye. This provides enough range to render a realistic painting.
There are other systems as well, like 7 value, 10-value or the complex munsell system. But I think the 5 and 9 value are enough to get you started.
Mixing a value scale

I have titanium white and ivory black on my palette.
First get the mid value. Now if you add equal amount of white and black, you wont necessarily get a mid value. It will most probably darker as black has more tinting strength. You can print and refer to my color wheel and value chart, to get the compare and get the middle value
For mixing light value, start with white, and then add a lil bit of black.
and for dark, start with black and add lil bit of white to it. you can always add more white to it if required.
if you initial mix is too off, scoop it and keep it aside, and remix from a fresh start instead of adding paint to the original mixture, else you may end up with a big pile of paint.
We have the 5-value scale here, Now if you mix the in between values you will arrive at the 9 value scale.

Just a note, don't put too much time trying to match the chart perfectly.. its only a guide, the important point is to create distinct steps that your eyes can clearly tell apart.
Painting the Cube
Step 1 - Cast Shadow:
I start with the black first. I grey it down a tiny bit. It is always a good practice to reserve the extreme dark and white for the last, so if you have to go any darker or lighter, you always have room to do that.

Step 2 - Top low-light face
Blocking in this top section with low-light. When blocking in a shape, try to paint over the line, instead of inside the line, so you dont leave any gaps when you paint around it later.

Step 3 - Plane in shadow
Painting plane in shadow, with dark at top followed by low-dark at bottom. I create a gradient once both the values are blocked in.

Step 4 - Plane facing us
Painting the light face. try to paint the edges with a clean single stroke. holding the bush somewhere in the middle and using your entire arm for the movement should help to get those clean stokes.

Step 5 - Base
Painting the base now with mid color on left followed by high-dark and dark as i move to right.
You could also use a bigger brush to make this quicker. Now for gradient there are a couple of ways you can achieve it, one way is to paint them separately and then blend in the middle, like we did for the shadow part of the cube in step3. Another way is to start from one end and then apply the incremental values along the gradient, here from left to right.

Step 6 - Background
For the background its the same application of gradient as we saw for the base, but with darker colors, black to low-dark to dark, from left to right. Don't try to create a perfectly smooth gradient here. Rarely in nature you will find a perfect gradients, aside from something like a clear sky. but even for skies I like to add subtle value variations and visible brush strokes.A bit of texture always looks more interesting than a smooth airbrush kind of look.
Notice that the dark value on the right side of the background is same as the right side of the base. It gives us a lost edge, which is much more interesting than shapes separated by hard lines. Make sure to lookout for such areas and blend them together.

Step 7 - Refining Edges
We can soften this edge at the back to create depth and atmosphere. I am placing a middle value between black and mid, ie. dark at the division. and then will blend the area to create a soft edge. Try not to blend two very different values straight away. A middle value helps bridge the transition more naturally.

Step 8 - Final touches
With a soft synthetic brush, adding some blur to the far end of the cube, just a little not much, It creates depth as the edge behind blends into the background.

Final Result
The painting is pretty good representation of the reference.
Note that we have not copied the image as it is with every detail, but have simplified the shapes and defined the form using values. This cube might seem simple, but it shows up constantly in real life. If you can paint light on a cube, you can understand light on buildings, interiors, and everyday objects. That’s how you train yourself to see form instead of getting distracted by color and detail.

If reading this post helped you, try this exercises yourself. I have few more such references which you can download and practice with.
You can also submit your paintings here for a free critique.
Thank you!